ArtsAutosBooksBusinessEducationEntertainmentFamilyFashionFoodGamesGenderHealthHolidaysHomeHubPagesPersonal FinancePetsPoliticsReligionSportsTechnologyTravel

A HTML Tutorial: A Beginner's First Tutorial in Creating a Web Page Form
Updated on May 6, 2014
Paper forms seem to becoming more and more obsolete in the Internet Age. This tutorial looks at the basics of creating HTML forms.

The Goal of this Tutorial: Introducing HTML <form> Essentials

Forms are an everyday element in life. Online forms for everything to completing a sweepstakes entry to doing ones taxes are ubiquitous. The reasons behind it are numerous but some of them involve lower cost, the ability to insert information, the elimination of repetitive entry, and information validation, collection, and aggregation. This tutorial covers the basic elements involved in creating forms.Later tutorials will cover such issues as to what to do with the information which a form can collect, verify, and aggregate.

The Basic Parts of A HTML Form

The basic parts of a HTML form are not much different than a printed form. There is some static information regarding the form. A number of text fields, boxes, or textareas to be completed and the distinguish difference a means of transmitting the form usually a submit button rather than the paper means of handing in the form or mailing it. Additionally, two other "active" elements of a form relate to clicking on checkboxes or clicking on a radio button.

The basic form is indicated with a form element. The format of the form element is

<form a any number of valid form attributes>
...........a number of statements which help describe the form format and input...
</form>

Typically, the statements which are among those "which help describe the form format and input..." include:

  • The <label> element represents a caption to a text input area.
  • The <input> element representing a typed data field, usually to allow the user to edit the data..

The form attributes are numerous. Several of this attributes relate to acceptable input and whether the input is immediately validated or not. The three which we will discuess but not actually implement in this tutorial are:

  • the method attribute -

    The method is set to a value of how the information entered in the form will be sent to your server side processing routine (e.g. PHP). By default it is set to get. The entered information is set by means of the URL. The alternative is that the information will be sent by post, for security reasons.

  • the action attribute -

    The action attribute indicates where the information is to be sent to. By default it is sent to the current page, indicated by #.

Illustration of the Basic form Element
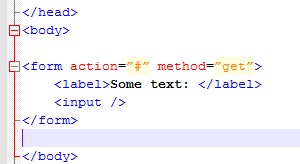
This is the most "bare bones" form one might create. It has beginning and ending tags and a label for an area  in which text may be input. But it does nothing with a SUBMIT!
This is the most "bare bones" form one might create. It has beginning and ending tags and a label for an area in which text may be input. But it does nothing with a SUBMIT!

Using the HTML <input> Element

We used an input element in a form to create a text box in the previous snapshot. O.K, there was no way to submit the data if we had opened this page in a browser, The input element solves this problem however in that it can also be used to create a submit button. In fact the input element is used to create: text boxes, submit buttons, radio buttons, and check boxes. Our next snapshot illustrates the creation of a submit button.

Using the HTML <input> Element
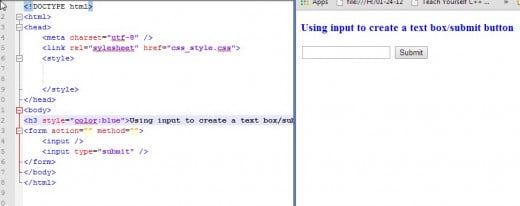
In this example we create both an area for text input and a button to submit the input by using the HTML  element.
In this example we create both an area for text input and a button to submit the input by using the HTML element.

Modifying the Text Displayed on the Submit Button

The text on the submit button is easily modified by adding the value attribute to the input element as illustrated below.

The Submit Button with Text Modified
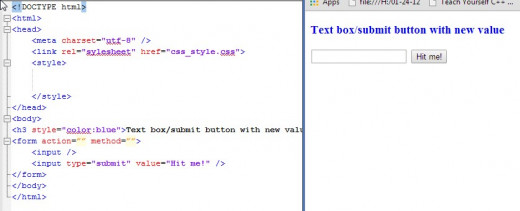
The text  displayed is now changed to "Hit me!" by using the value attribute.
The text displayed is now changed to "Hit me!" by using the value attribute.

The HTML <label> Element

Up to now we have no idea what type of information should be entered. For this we add a <label> element to associate text with the text box.

Quite often when users encounter forms they assume some action will happen to activate the text box based on the text. In other words, clicking on the label for the text box makes the box “come alive”. To do this you have to add an association between the label and the text box. This is done by using the attribute “for” in the label element and the "id" attribute in the input element for the text box. The value for the “id” attribute must match the value for the "for" attribute of the label element (as indicated in the snapshot). Clicking on the text field actives the text box. The border of the text box will change colors. Another attribute commonly used used to identify the textbox is the input “name": attribute. This attribute really becomes a convenience in referring to the entered text in either JavaScript or a server side language implementation.

Adding a <label> Element
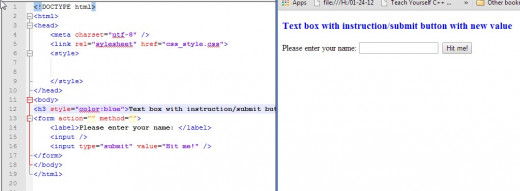
We added a label element to our form. Later we will show how using the for and id attributes helps the users associate the label with a text borx or area, creating a positive UX (user experience).

Creating a Element for Input

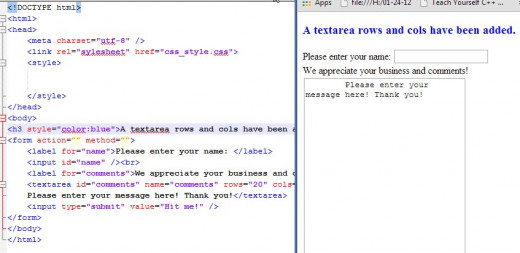
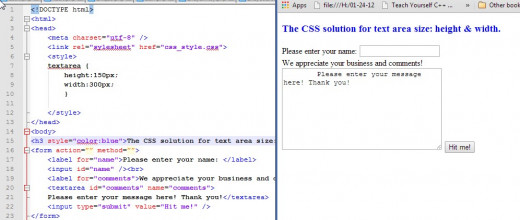
Often, a text box isn't sufficient for longer messages, so a <textarea> element is used. The <textarea> is not a self-closing element, because optionally some default value may be indicated by the developer which is placed between the beginning and ending tags, These text area attributes can refer to the size of the textarea and can be specified in terms of either rows and columns or height and width in pixels.The CSS solution (which is probably a better one in most cases) is shown in the third snapshot which follows

Our next screenshot show the addition of a label for the textarea. In this line we connect the "for" attribute of the label with the "id" of the area. We also added a name attribute which as mentioned above is for JavaScript or server side language convenience as previously noted.

A <textarea> Example
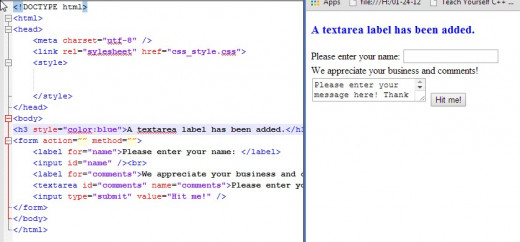
A  has been added. The textarea has been prefilled with some comment information which the user may discard or modify.
A has been added. The textarea has been prefilled with some comment information which the user may discard or modify.

Changing the <textarea> Default Size

The area size fo the  can be modified by specifying the number of rows and columns as attributes.
The area size fo the can be modified by specifying the number of rows and columns as attributes.

Changing the <textarea> Size Via CSS

If there are multiple t elements of the same size a better solution would be to do the styling in CSS.

Two Other Forms of Input: Checkboxes and Radio Buttons

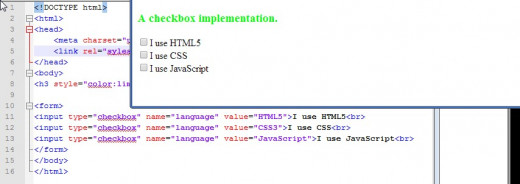
There are two other forms of input: radio buttons and checkboxes. The differ visually in that checkboxes appear as small boxes which can be checked . Radio buttons are small circles which also can be checked. They differ in their use in that multiple checkboxes as options may be ckecked. Checkboxes also may be unchecked. Radio buttons an mutually exclusive. One and only one may be checked for any one set of selections. Once checked a radio button may be changed but not unset.

The following snapshot illustrate radio button and checkbox implementations.

Radio Button and Checkbox Examples
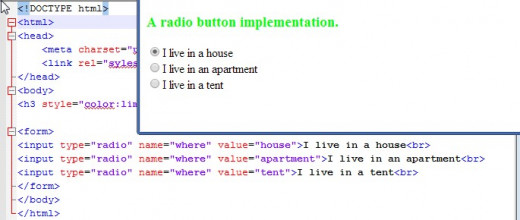
Radio button use is appropriate where only one option would make sense.
Checkboxes permit a user to select multiple iyems.

Did This Tutorial Meet Your Needs?

Cast your vote for Please rate this tutorial on relevance. Thanks!

Wrap Up and What's Next

This tutorial should give the reader a good start on some basic construction of forms and some of the options available: text boxes, text areas, checkboxes, and radio buttons. There is much more formatting thta one can do. The thrust of some of the issues we ill cover in later tutorials involve ease of use (e.g. auto completion), validation, and server side collection and use of form data.

working

This website uses cookies

As a user in the EEA, your approval is needed on a few things. To provide a better website experience, hubpages.com uses cookies (and other similar technologies) and may collect, process, and share personal data. Please choose which areas of our service you consent to our doing so.

For more information on managing or withdrawing consents and how we handle data, visit our Privacy Policy at: https://corp.maven.io/privacy-policy

Show Details
Necessary
HubPages Device IDThis is used to identify particular browsers or devices when the access the service, and is used for security reasons.
LoginThis is necessary to sign in to the HubPages Service.
Google RecaptchaThis is used to prevent bots and spam. (Privacy Policy)
AkismetThis is used to detect comment spam. (Privacy Policy)
HubPages Google AnalyticsThis is used to provide data on traffic to our website, all personally identifyable data is anonymized. (Privacy Policy)
HubPages Traffic PixelThis is used to collect data on traffic to articles and other pages on our site. Unless you are signed in to a HubPages account, all personally identifiable information is anonymized.
Amazon Web ServicesThis is a cloud services platform that we used to host our service. (Privacy Policy)
CloudflareThis is a cloud CDN service that we use to efficiently deliver files required for our service to operate such as javascript, cascading style sheets, images, and videos. (Privacy Policy)
Google Hosted LibrariesJavascript software libraries such as jQuery are loaded at endpoints on the googleapis.com or gstatic.com domains, for performance and efficiency reasons. (Privacy Policy)
Features
Google Custom SearchThis is feature allows you to search the site. (Privacy Policy)
Google MapsSome articles have Google Maps embedded in them. (Privacy Policy)
Google ChartsThis is used to display charts and graphs on articles and the author center. (Privacy Policy)
Google AdSense Host APIThis service allows you to sign up for or associate a Google AdSense account with HubPages, so that you can earn money from ads on your articles. No data is shared unless you engage with this feature. (Privacy Policy)
Google YouTubeSome articles have YouTube videos embedded in them. (Privacy Policy)
VimeoSome articles have Vimeo videos embedded in them. (Privacy Policy)
PaypalThis is used for a registered author who enrolls in the HubPages Earnings program and requests to be paid via PayPal. No data is shared with Paypal unless you engage with this feature. (Privacy Policy)
Facebook LoginYou can use this to streamline signing up for, or signing in to your Hubpages account. No data is shared with Facebook unless you engage with this feature. (Privacy Policy)
MavenThis supports the Maven widget and search functionality. (Privacy Policy)
Marketing
Google AdSenseThis is an ad network. (Privacy Policy)
Google DoubleClickGoogle provides ad serving technology and runs an ad network. (Privacy Policy)
Index ExchangeThis is an ad network. (Privacy Policy)
SovrnThis is an ad network. (Privacy Policy)
Facebook AdsThis is an ad network. (Privacy Policy)
Amazon Unified Ad MarketplaceThis is an ad network. (Privacy Policy)
AppNexusThis is an ad network. (Privacy Policy)
OpenxThis is an ad network. (Privacy Policy)
Rubicon ProjectThis is an ad network. (Privacy Policy)
TripleLiftThis is an ad network. (Privacy Policy)
Say MediaWe partner with Say Media to deliver ad campaigns on our sites. (Privacy Policy)
Remarketing PixelsWe may use remarketing pixels from advertising networks such as Google AdWords, Bing Ads, and Facebook in order to advertise the HubPages Service to people that have visited our sites.
Conversion Tracking PixelsWe may use conversion tracking pixels from advertising networks such as Google AdWords, Bing Ads, and Facebook in order to identify when an advertisement has successfully resulted in the desired action, such as signing up for the HubPages Service or publishing an article on the HubPages Service.
Statistics
Author Google AnalyticsThis is used to provide traffic data and reports to the authors of articles on the HubPages Service. (Privacy Policy)
ComscoreComScore is a media measurement and analytics company providing marketing data and analytics to enterprises, media and advertising agencies, and publishers. Non-consent will result in ComScore only processing obfuscated personal data. (Privacy Policy)
Amazon Tracking PixelSome articles display amazon products as part of the Amazon Affiliate program, this pixel provides traffic statistics for those products (Privacy Policy)
ClickscoThis is a data management platform studying reader behavior (Privacy Policy)